
A friend asked if I might be able to help her make a wrap skirt similar to a style she had seen for sale. I had actually never made a wrap skirt before, but I am always up for a challenge, so I said I would look into it. I decided to make one for myself as a prototype. I have included the errors I made in sewing because this is part of the learning experience, and shows that mistakes can be rectified and still result in a good outcome. The next thing will be helping the friend to make hers!
Correct sewing instructions in bold type have been included in the body of this post. The cutting instructions can be followed as written.
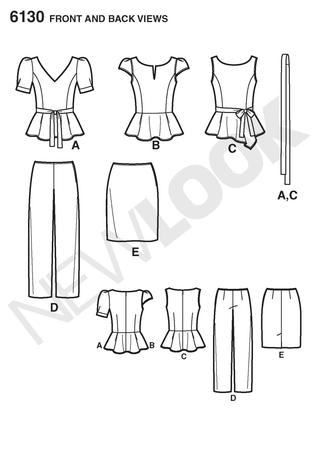
I have used New Look pattern 6130 before for a simple, straight skirt. The basic pattern, pictured here as #E, is a no-nonsense, easy skirt, made with 3 basic pieces, plus a back kick pleat for ease, a centre back zip closure and bias binding to face the top of the skirt, having no waistband. It is a comfortable skirt, worn just above the knee.
I recently made a shorter version in cotton interlock without a zip, attaching the skirt to a band of ribbing to make it a pull-on skirt.

The challenge in making a wrap skirt was to think of the differences in construction. First, a band of some description is required to hold the skirt on, fastening by a tie or other type of fastener. My friend's selection used press studs, but I chose buttons because my waist fluctuates a lot, and buttons are easier to move. (Plus, I have loads of buttons and hate sewing press studs!) The band itself took a great deal of thought and I have described this further down.
Secondly, a wrap skirt needs an additional piece to wrap across the front. I worked with the idea of cutting two identical front pieces then adapting both.
Thirdly, as the skirt is wrapped on and fastened, a zip is not required. Since the centre back seam of the skirt above is for the purpose of a zip and kick pleat (also not required for movement in a wrap skirt), I decided that a single back piece would do, especially for simplicity of structure and appearance.
Cutting
The pattern pieces for this project included:
Front - cut 2 on fold
Back - cut 1 on fold
Centre back band - cut 1 on fold
Side back band - cut 2
Front band - cut 2 on fold
Allow extra fabric to make the additional front piece and the band. Depending on the style, an extra 50cm of fabric on top of the base pattern specification should be sufficient.
The basic front piece is cut on the centre fold. I cut two of these to begin with. As the back pattern piece allows for a seam and pleat, I laid the pattern piece on the fold of the fabric, as per the front piece, and aligned the centre back seam line with the fold, having the pattern piece overhanging the fold, as seen in the photo below.
After cutting both fronts, I placed them right sides together and cut a straight line on one side only from the hem to the top corner, trimming off the curve that usually follows the hip curve. This was to achieve a straight line along the finished wrapped section. On the underlap, it sits on the right of front, unseen; on the overlap, it sits on the left, where it buttons.

 |
1. Front piece, laid on fold
2. Back piece, lining up normal centre back seam line with fold of fabric to make a single back piece
3. Cutting one side of each front piece straight from hemline to waistline
4. Trimmed piece from fronts
|
Placing the centre back band piece on the fold, with the fabric stripes going horizontally (cross grain), and the side back band pieces with the grain line perpendicular to the cross grain, the back band pieces were cut. (The new paper pattern pieces could have included a grain line, if required. To do this, you could rule a line at right angles to the straight grain on the original pattern piece, and follow that line on the straight grain of the fabric.)
Front band had to be cut twice for the two fronts, allowing for the cross grain as above. Then one end of each front band was trimmed to match the skirt pieces. Match the two band pieces right sides together before cutting this straight line.
 |
1. Back band pieces, showing the cutting line as matching the dart line
2. The front band trimmed to match skirt trimmed section
3. Band and top of skirt match
4. Back band sewn together, seams pressed open
|
I sewed the darts on the back skirt piece as per usual, pressing towards the centre.
I sewed together the back band pieces, pressing open the seams, then cut and ironed on interfacing to match the whole back band. Cutting and ironing interfacing for the front bands was straightforward.
 |
| Iron-on interfacing on band sections |
Now, here is where I started to go wrong. I will tell it as I did it, because we can all learn from mistakes, and I was experimenting the whole time. I will also explain how I could have done this better, but my illustrations show what I actually did. See the bold type section below for correct instructions.
I sewed the tops of the bands to the skirt sections, matching the right side of the bands with the wrong side of the skirt. This was not my error; it was correct to match right side of band to wrong side of skirt, as the finished band sections are sewn overlapping the skirt. The error was sewing the bands before the side seams.
If I did this style again, I would sew all the band sections together (see instructions 6-8), leaving the straight ends of the front pieces unsewn, and would do the following before attaching the band:
1. Sew darts and press towards centre back.
2. Sew the skirt pieces together at the side seams, leaving the straight edges unsewn.
3. Trim the open corners of the straight edges at the hemline to make curved corners.
4. Press under all around the straight edges and hem, pressing twice to create a rolled hem edge
5. Pin (if necessary) and stitch all around the rolled hem, from top of straight edge all around to top of opposite straight edge (down one side, across hemline, back up the other side).
Make the band:
6. Sew side back band pieces to centre back band piece. Press seams open.
7. Cut interfacing to match back band and interfacing to match front band pieces. Iron on.
8. Sew curved sides of front band to back band at sides. Press seams open. Leave straight edges unsewn.
Attach band to skirt:
Keep in mind that the wrong side of the skirt is sewn to the right side of the band. This is because the band then gets pressed over the right side of the skirt, leaving a neat seam at the top of the finished skirt. Trust me.
9. Once the skirt section is hemmed, place right side of band on wrong side of skirt, matching seams, dart lines and straight ends.
10. Pin and sew band to skirt.
11. Press under all raw edges of band, keeping straight ends in line with hemmed straight edges of skirt.
12. Press band over the skirt, ensuring a neat seam at the top.
13. Matching seams, centres and darts, and easing as necessary, pin the band over the skirt section as a second layer, then top stitch all around, enclosing the straight ends of the band and all raw edges.
14. Make 2 buttonholes on outer end of band (sits on left when worn).
15. Make one buttonhole on under edge of band (sits on right when worn).
16. Fit skirt on wearer to mark where buttons go. 2 buttons should go on under section of band to match buttonholes on overlap. The other button is sewn to the underside of the outer band and buttoned into the hidden buttonhole.
17. Hand sew buttons in place, taking care with the "hidden" button not to sew right through the band so that stitching is hidden on the outside.
 |
| Band sections sewn to skirt sections. Note the inside of the darts showing the wrong side of skirt piece. |
I won't go into the full detail of how and when I realised I had done things in the wrong order. Let's just say Mrs Seam Ripper worked overtime and heard muttering.
Undoing the wrongly sewn side seams, I sewed the back band to the two fronts and pressed open, making one long band with the straight edges unsewn. I then unpicked a little of the seam where the bands had been sewn to the skirt (to avoid having to redo everything), and sewed the side seams of the skirt with right sides together (der). Because my fabric looks the same on both sides, the alarm bells took longer than they should.
 |
1. A small section unpicked to allow me to sew the side seams correctly.
2. Side seams of band, pressed open
3. Sewing side seams of band
|
I looked at the thickness of the band and decided it could be turned under and stitched, but that it should not have been attached to the skirt's straight sides without those having been finished off first. So the next step was to do more unpicking, just a little, and hem the edges of the skirt.
I decided to curve the open corners of the bottom of the skirt, then pressed up all around from the top of the straight edge of the skirt, via the hemline, to the top of the opposite straight edge. I pressed it up twice, taking care at the curved corners to reduce bulk and get all raw edges rolled in. Then I stitched this hem all around.
 |
1. After pressing in the rolled hem edge, I pressed under the straight edge of the band
2. Pressing under twice for a rolled hem
3. Cutting the curves on both corners
4. Pressing the curve
5. Turning edges under for pressing
|
Once I had the whole skirt section neatly hemmed, I was able to address the edge of the band. I pressed under one thickness on the straight, open ends of the band, taking care to keep it in line with the hemmed edge of the skirt pieces.
Next, I pressed under all around the raw edges of the band and pressed the band over the skirt, ensuring a neat seam at the top. Matching seams, centres and darts, and easing as necessary, I pinned the band over the skirt section as a second layer, then top stitched all around, enclosing the straight ends of the band and all raw edges.
 |
| Pressing under all the raw edges of the band and pressing the top seam to give the top of the band a neat edge |
Once the basic garment was made, I made buttonholes as described in the instructions above. Unfortunately, my machine was not very co-operative. Not only did I have to go and look up in the manual how to make a buttonhole (fading memory!), but it did not stitch well through all thicknesses, so I reverted to the hand-made buttonholes my dear mother taught me to do when I got in trouble with my school sewing teacher for cutting the buttonhole before sewing it. Thanks, Mum xx.
 |
1. Pinned band in place, overlapping body of skirt
2. Buttonholes
3. Handsewing on buttonholes
4. Fitting to work out button placement
5. Finished skirt
|


